


Friday, July 1, 2016
Boost Class Morale fo' FREE!
Monday, June 20, 2016
Analyzing Phonics Data Using Google Forms - Part 2
Last week, I showed you how to create a free, customizable typing center using Google Forms. If you didn't see that post, check it out here then meet me back on this page :). At the end of that post, I promised you an update to show you how to duplicate the form for future use and make it easily accessible for student use.

By this point, you should have already selected a Phonics Skill to create your Google Form. To see my example of how I am using Google Forms, click here.
Your Google Form is complete now and you might be thinking, "So...now what?" "How do I get my kids on this?" "How do I make MORE?!"
Wednesday, June 15, 2016
How to Assess your Students' Phonics Skills with a FREE Typing Center!
Do you find yourself wanting a fun and engaging way to get real-time data on your students' phonics skills? Sure you can pull your students aside for old-school assessments but that is not fun for you OR for them. Today, I wanted to share with you an easy-to-make Typing Center using Google Forms. You'll not only get the real-time data in an easy-to-read spreadsheet, you'll also have an engaging center for your students during their ELA computer time.


Look through your files - you should see your new center and the spreadsheet right next to it!
 Click your Response form and you'll see all of your questions lined up ready to go. You'll see that my form has one response already filled in. I went to the "preview" of my form (go back to your home and click your question page. There will be an eyeball at the top that means Preview. Click that and do your center). I input my name as "Answer Key" and then put all of the correct answers in.
This serves 2 purposes:
1. I made sure my center looked exactly how I wanted
2. I now have a reference of correct answers when I go back to see what my students have typed!


To determine if this is something you'd be interested in making for your students, check out my REALLY simple typing center here. Don't worry - I made a duplicate version of this form so you are more than welcome to type in your own responses. I'll show you how to duplicate your form next week!
1. Set up your Google Drive Account
If you haven't already, you'll want to click this link to go to Google Drive. Once there, you'll click "Sign Up!" The Google Wizards will make sure you get situated correctly. When you're done, come back here!2. Create a New Form

When you log in to Google Drive, you'll see a page similar to this. You'll want to click the red button in the top left that says "New."

On this drop-down menu, click "More." This will give you more options where you can select "Google Forms."
3. Customize Your Form
You should see a VERY purple page now that says "Untitled Form." I like to make things pretty before I get started so we're going to customize the look of our page before we keep going.
Look at the top of your page. You'll see a lot of small icons, one of them looks like a paint palette. Click this icon and customize the color and/or background of your page. You'll also want to go ahead and give your form a name. You can rename your form by simply clicking on the text and typing what you'd like.

My form is titled "Short U" because I will be inputting questions about short u words! It's hard to see in this picture but I also typed quick directions in the line beneath it: "Look at the pictures below and type the sounds you hear."
4. Create Your Questions
You've probably still got a big ol' "Untitled Question" on your form. You'll want to think about what type of questions you plan to ask your students on this form. For my first graders, I want to use my form to see how they are hearing sounds and stretching out those sounds. I will need to look at the list of choices the form gives me to think about what best suits my needs. Click where it says "Multiple choice" next to Untitled Question.

Make your choice. From here on out, mine will resemble the "short answer" option. You'll also want to click the slider on this section so that it becomes required. You want to make sure your students answer all of your questions so by clicking this slider, it will prompt them to go back and check before they can move on.
You've now chosen the type of question and made it required, but you still don't have an actual question! For my purposes, I wanted the students to look at a picture and write the sounds they hear. So, I need to add an image. Look to the right of the question box and you'll see this toolbar.
Click the icon you see above to "add image."

This window will pop up giving you the options of where your picture can come from. Personally, I take the "ain't nobody got time fo' dat" approach and go with "By URL."
To get an image by URL, simply Google Image Search whatever you're looking for. When you've found your picture, right click (or for Mac Users, two-finger click) and select "Copy Image URL" or "Copy Image Address."

Go back to your Google Form and select "By URL." Paste the link you just copied into the text box. Your image should appear! I don't know why but I always think that part is so COOL!

Click the blue Select button and you should now see your picture on the form. You can now click on the "Untitled Question" and write what you would like to ask your students. Mine simply says, "1. What sounds do you hear?"

Now you have two choices, you can either continue adding questions using the same process as above by simply clicking "Add Question" in the toolbar to the right OR you can do what I do...
I do not like when my students have to scroll on the computer simply because my first graders are still mastering left clicking - scrolling is for the birds! So, I choose to "add a section."
The difference between adding a question and adding a section is a Next button. By adding a question, your students will simply continue scrolling down the page until they have answered all of your questions. By adding a section, your students will only see one question at a time and will simply click Next when they're ready (think: MAP or FAST Testing).
Regardless of what you choose, the process will be the same for all of your questions from here on out! Your page will start to break apart into separate boxes like this:

I put "Short U" at the title of each page simply for personal preference. You may do it however you'd like. :)
NOW: How do you get the data from all of this?!?!?!
5. Set up a data spreadsheet
The BEST part about Google Forms is that it can take all of your input (from parents, students, etc.) and pump it into an Excel Spreadsheet with NO WORK FROM YOU!! I don't know about you, but Excel and I are not friends. I struggle with the formulas so when I learned that Google does it on its own, I thought, "Come home to mama!"
Because my Google Form is designed for a 15 minute center rotation, I only included 8 questions. You can include however many you'd like. When you've input all of your pictures and questions, you're ready to set up the Responses.

Scroll cllllll the way back to the top until you see "Questions" and "Responses" tabs above your first question. "Questions" should be highlighted because you've been working on questions thus far! Click "Responses." You will see a little green box with two white lines. Click that button to "Create Spreadsheet." I promise it's not scary!
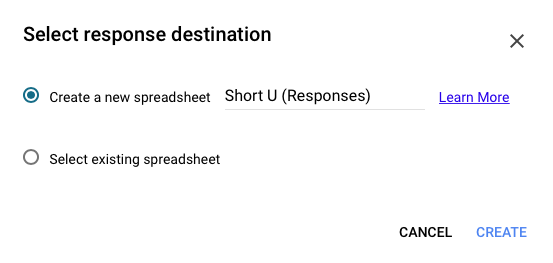
Select Create a new spreadsheet.
DONE.
You can now click back to home...


This serves 2 purposes:
1. I made sure my center looked exactly how I wanted
2. I now have a reference of correct answers when I go back to see what my students have typed!

I know this was long but THANK YOU for bearing with me! Come back soon to see how you can easily DUPLICATE this form and just retype your questions for each phonics skill you teach. Even better, I'll also show you how to set it up easily on your desktop for student access.
Have a great Wednesday!
Friday, June 12, 2015
How I Afforded 3 Mini iPads - Part 2
You can check out Part 1 in this series where I debated between Donorschoose and GoFundMe here. If you've already decided which route you're going to take...then you're in the right place :)

I am what I like to refer to as a bargain shopper...my husband probably just thinks I'm a cheapskate. There was a time in my life where I might have tried to deny this about myself, but when you always opt for Marshalls, TJMaxx, the Dollar Spot at Target, or the Dollar Store before you even think of name brand places, you've just got to embrace the penny pincher gene. I'm so much of a money saver that even when I had, in a sense, FREE MONEY given to me by friends and family to purchase my class iPads, I was STILL looking for a deal! I tried a few things...


 Having no luck with my sales detective abilities, I remembered my brother mentioning refurbished items when he searched for his Mac! In case you aren't familiar with refurbs, it's a fancy way of saying it's a used item that had some plastic surgery. When it is an "Apple Certified Refurbished" item, it means the item has passed all of the same tests that a brand new item would have to pass before it is sold. After the piece passes the test, it gets a new casing on the outside and it's packaged into its fancy white box, complete with user manual and power cord. Even more - it comes with the same 1 year warranty that you would receive with a brand new one! I found my 3 minis on here for $209!!! You can't double up with the educator discount on here so that means I saved $40/iPad mini. That means $120 total. That's almost half of another brand new iPad mini!! It was so easy. I chose the free shipping to have it delivered to the store. They e-mailed me when it shipped and texted me when they were available for pickup in the store. You are treated with the same customer service as if you were buying the brand new item in store. I am getting giddy again just thinking about it :)
As I type this, there are no more of these listed on their site. To my knowledge, refurb items are not kept in the store so you will just need to check this site fairly frequently. You never know when they might add a few more!
 Amazon actually has quite a few refurbished iPads listed. However, I was a tad nervous. There were all kinds of people who left reviews about how amazing their product was when they received it! But there were also multiple people who left reviews about the dents, scratches, horrible battery life, etc. etc. My paranoia got the best of me and I decided against it. If I'm going to get something this expensive as a refurb, I want it to come straight from the tech giant!
What I did get through Amazon were my cases! I found these for only $10 a piece. (Excuse the quality of the pictures, I just got them today and I was SO EXCITED that I snapped quick phone pics).


Because I haven't used them in the classroom, I can't speak to the durability. However, they look exactly as they did online, super lightweight, they're soft foam and not hard plastic and the best part (in my opinion) is they stand up! I thought that would be so much fun for the kids as they listen to stories on the minis :)


I am what I like to refer to as a bargain shopper...my husband probably just thinks I'm a cheapskate. There was a time in my life where I might have tried to deny this about myself, but when you always opt for Marshalls, TJMaxx, the Dollar Spot at Target, or the Dollar Store before you even think of name brand places, you've just got to embrace the penny pincher gene. I'm so much of a money saver that even when I had, in a sense, FREE MONEY given to me by friends and family to purchase my class iPads, I was STILL looking for a deal! I tried a few things...

This is by far the quickest and simplest way to save on Apple products. I opted out of it simply because I found a better deal elsewhere. However, if you're just wanting something quick, this is it. Just by being an educator, you automatically save $10 on your iPad purchase. That means your iPad mini goes from $249 to $239! $10 might not sound like a lot, but I *technically* would have saved $30 total if I went this route when buying my 3 minis. For those checking prices on Apple's site right now, you're probably discovering that I did not go with the "latest and greatest." In fact, I am quoting the price of the original iPad mini. It is the cheapest and when you are talking about purchasing things for the classroom, you know as well as I do that cost efficiency is one of your main priorities!
Also, don't go to your Apple store and ask if they have a super top secret educator discount that they only advertise to people who specifically ask for it - because they don't. I tried...

I drive my husband insane because even with knowing I could save $30 with that discount, and ultimately $60 total by the time I purchase all 6 of my minis, I was determined to find a better deal elsewhere. Father's Day is conveniently around the corner so I've been searching Google and reading all of the rumors about upcoming sales. This is a little crazy requires a lot of dedication, so you might just choose to sign up for e-mails from a few stores that you know have run deals on iPads in the past. I was mostly checking Best Buy, Walmart, and Target. I also checked out my local Half Price Books, too!

As I type this, there are no more of these listed on their site. To my knowledge, refurb items are not kept in the store so you will just need to check this site fairly frequently. You never know when they might add a few more!

What I did get through Amazon were my cases! I found these for only $10 a piece. (Excuse the quality of the pictures, I just got them today and I was SO EXCITED that I snapped quick phone pics).
Because I haven't used them in the classroom, I can't speak to the durability. However, they look exactly as they did online, super lightweight, they're soft foam and not hard plastic and the best part (in my opinion) is they stand up! I thought that would be so much fun for the kids as they listen to stories on the minis :)
The reason I included this as a money-saving tip is because by going with this brand and color, I received a buy two, get one free discount! When you are searching for your items on Amazon, scroll down on the product page to where it says "Special Offers and Promotions." This is where I discovered the deal! It wasn't pointed out in any other part of the listing. Even more crazy, this crazy bright orange is the only color they offered the deal on! At least I'll always be able to find them, right?! All in all, I saved $10 on cases by going with these.
Because of all of these ridiculous highly creative ideas from the series thus far, I have acquired 3 iPad minis and 3 cases at absolutely no cost to me. I can't wait to see the difference in my students' learning this year!!
If you have any other money-saving tips, PLEASE comment below because this girl still has 3 more to go ;)
How I Afforded 3 Mini iPads - Part 1

For those of you using Common Core, you know about the technology standards and how much pressure there is to help your kids meet all of them (and the mathematics, ELA, and science standards, as well!). I made a diligent effort to incorporate technology through interactive PowerPoints that I designed for individual lessons, Computers as a Literacy Center, watching videos, etc., etc., etc.!
I saw my kids becoming independent with technology so the Kindergarten team decided we would utilize the school's available iPads for an end-of-year research project. The students worked so hard throughout the year to become researchers...and they LOVED it. They would not stay off of fun websites like PebbleGo and Brainpop Jr. even during indoor Recess! We decided as a team that we would have the students research an insect independently and we would use Tellagami to present it to the class.
"It'll be fun!" they said. "The kids will love it!" they said. "We can send the videos home to parents!" they said.
That's all fine and dandy until the Big Kids are utilizing every tiny nook and cranny in the school (including both the regular computer lab and the lab in the library) during their Big Kid State Testing :).
Students and teachers all got a major lesson in flexibility at the end of the year, that's for sure.
All of this explains why I am so excited to begin next school year with at least 3 mini iPads!!! (At no expense to me!)


(or why I chose to use GoFundMe)
A lot of people have used donorschoose.org to fund their wish list items for their classrooms. I looked into this intently for quite some time and realized it had a lot of benefits:
- It is completely free to use.
- All donations are tax-deductible for your donors (because it is a charity website).
- There is an available promo code that your donors can input to match their donation of up to $100 dollar-for-dollar. I had a friend have her iPad project become fully funded in only a few days because of this! Keep in mind that this code is only usable for two projects a year.
- Your donors will all receive a note from you as well as picture updates of your students using the product.
- The website purchases and ships the product you've campaigned for to your school. We all know that our time is limited and sometimes locating the products can take a lot of our valuable time!
I am a paranoid lady and when I saw the paperwork involved for my friend...I opted for GoFundMe instead. You can see my GoFundMe page to get a feel for how it works. Essentially, it is the same process of identifying your project, creating a page, and sending the link to everyone you know! Here were some of its selling points for me:
- It is free, too!
- Your project does not have to go through an approval process. I signed up, created, and shared my link to friends and family in about 30 minutes. It does take some time for your project to gain approval to appear in the website's search function, however.
- There is no time limit on your project. You could even continue to receive funds after your project completes, unless you choose to close it.
- You design your own rewards levels. You can see the levels I designed on my page. You know who your audience is..make your rewards appealing to them!
- You don't have to wait until the campaign ends to receive your funds. My project is only half-funded and I have already received 3 of my mini iPads and 3 cases because you can opt to have the funds delivered to your account as frequently as you would like. Bear in mind, because the website is free, they get their funds by keeping 5% of every donation and WePay keeps 3% whenever they send it to your bank account. Keep those percentages in mind when setting your funding goal!
- Because you are receiving the funds, you make the purchase. This means that these will 100% be yours and not the school's! That is a big seller for many of your donors. They want to know for certainty that their dollars are helping you and your students. Your donors don't want to feel like they are throwing money at any random Joe in your school!
Both websites are great (and free!) options. Use whichever one makes more sense for you!
Thursday, June 11, 2015
It's official - I'm a newb.
Hey everyone!
My name is Amanda and I'm a primary grades teacher in central Kentucky! I just completed my KTIP year in Kindergarten and I am excited to begin my second year as a first grade teacher in the fall! Like everyone else on the internet, I have a lot of ideas that I would love to share with all of you!
I strongly believe that a classroom should never be a place where the teacher is the end-all to knowledge. Rather, the classroom is a learning community designed to help everyone (teachers included!) to learn throughout the year. This is also how I hope to run my blog! While I have so many ideas - more than my little brain can handle - I am even more interested in getting to know the immense teaching community online and learn from all of YOU! I can't wait to get started :)
Thanks for stopping by!
Subscribe to:
Comments (Atom)