


To determine if this is something you'd be interested in making for your students, check out my REALLY simple typing center here. Don't worry - I made a duplicate version of this form so you are more than welcome to type in your own responses. I'll show you how to duplicate your form next week!
1. Set up your Google Drive Account
If you haven't already, you'll want to click this link to go to Google Drive. Once there, you'll click "Sign Up!" The Google Wizards will make sure you get situated correctly. When you're done, come back here!2. Create a New Form

When you log in to Google Drive, you'll see a page similar to this. You'll want to click the red button in the top left that says "New."

On this drop-down menu, click "More." This will give you more options where you can select "Google Forms."
3. Customize Your Form
You should see a VERY purple page now that says "Untitled Form." I like to make things pretty before I get started so we're going to customize the look of our page before we keep going.

Look at the top of your page. You'll see a lot of small icons, one of them looks like a paint palette. Click this icon and customize the color and/or background of your page. You'll also want to go ahead and give your form a name. You can rename your form by simply clicking on the text and typing what you'd like.

My form is titled "Short U" because I will be inputting questions about short u words! It's hard to see in this picture but I also typed quick directions in the line beneath it: "Look at the pictures below and type the sounds you hear."
4. Create Your Questions
You've probably still got a big ol' "Untitled Question" on your form. You'll want to think about what type of questions you plan to ask your students on this form. For my first graders, I want to use my form to see how they are hearing sounds and stretching out those sounds. I will need to look at the list of choices the form gives me to think about what best suits my needs. Click where it says "Multiple choice" next to Untitled Question.

Make your choice. From here on out, mine will resemble the "short answer" option. You'll also want to click the slider on this section so that it becomes required. You want to make sure your students answer all of your questions so by clicking this slider, it will prompt them to go back and check before they can move on.

You've now chosen the type of question and made it required, but you still don't have an actual question! For my purposes, I wanted the students to look at a picture and write the sounds they hear. So, I need to add an image. Look to the right of the question box and you'll see this toolbar.

Click the icon you see above to "add image."

This window will pop up giving you the options of where your picture can come from. Personally, I take the "ain't nobody got time fo' dat" approach and go with "By URL."
To get an image by URL, simply Google Image Search whatever you're looking for. When you've found your picture, right click (or for Mac Users, two-finger click) and select "Copy Image URL" or "Copy Image Address."

Go back to your Google Form and select "By URL." Paste the link you just copied into the text box. Your image should appear! I don't know why but I always think that part is so COOL!

Click the blue Select button and you should now see your picture on the form. You can now click on the "Untitled Question" and write what you would like to ask your students. Mine simply says, "1. What sounds do you hear?"

Now you have two choices, you can either continue adding questions using the same process as above by simply clicking "Add Question" in the toolbar to the right OR you can do what I do...

I do not like when my students have to scroll on the computer simply because my first graders are still mastering left clicking - scrolling is for the birds! So, I choose to "add a section."

The difference between adding a question and adding a section is a Next button. By adding a question, your students will simply continue scrolling down the page until they have answered all of your questions. By adding a section, your students will only see one question at a time and will simply click Next when they're ready (think: MAP or FAST Testing).
Regardless of what you choose, the process will be the same for all of your questions from here on out! Your page will start to break apart into separate boxes like this:

I put "Short U" at the title of each page simply for personal preference. You may do it however you'd like. :)
NOW: How do you get the data from all of this?!?!?!
5. Set up a data spreadsheet
The BEST part about Google Forms is that it can take all of your input (from parents, students, etc.) and pump it into an Excel Spreadsheet with NO WORK FROM YOU!! I don't know about you, but Excel and I are not friends. I struggle with the formulas so when I learned that Google does it on its own, I thought, "Come home to mama!"
Because my Google Form is designed for a 15 minute center rotation, I only included 8 questions. You can include however many you'd like. When you've input all of your pictures and questions, you're ready to set up the Responses.

Scroll cllllll the way back to the top until you see "Questions" and "Responses" tabs above your first question. "Questions" should be highlighted because you've been working on questions thus far! Click "Responses." You will see a little green box with two white lines. Click that button to "Create Spreadsheet." I promise it's not scary!
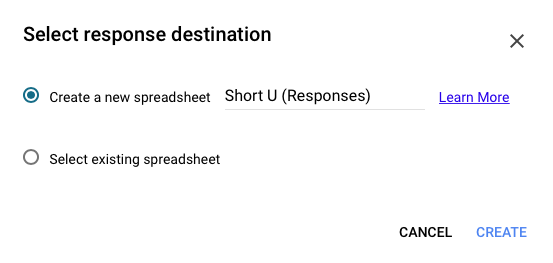
Select Create a new spreadsheet.
DONE.
You can now click back to home...


This serves 2 purposes:
1. I made sure my center looked exactly how I wanted
2. I now have a reference of correct answers when I go back to see what my students have typed!

I know this was long but THANK YOU for bearing with me! Come back soon to see how you can easily DUPLICATE this form and just retype your questions for each phonics skill you teach. Even better, I'll also show you how to set it up easily on your desktop for student access.
Have a great Wednesday!
No comments:
Post a Comment